Search This Blog

Monday, December 15, 2014

JBPM Integration with Maven, OSGi, Spring, etc.

Chapter 18. Integration with Maven, OSGi, Spring, etc.

18.1. Maven
18.2. OSGi
jBPM can be integrated with a lot of other technologies. This chapter gives an overview of a few of those that are supported out-of-the-box. Most of these modules are developed as part of the droolsjbpm-integration module, so they work not only for your business processes but also for business rules and complex event processing.

18.1. Maven

By using a Maven pom.xml to define your project dependencies, you can let maven get your dependencies for you. The following pom.xml is an example that could for example be used to create a new Maven project that is capable of executing a BPMN2 process:
<?xml version="1.0" encoding="utf-8"?>

<project xmlns="http://maven.apache.org/POM/4.0.0" 

    xmlns:xsi="http://www.w3.org/2001/XMLSchema-instance"

    xsi:schemaLocation=
 "http://maven.apache.org/POM/4.0.0 http://maven.apache.org/maven-v4_0_0.xsd">


  <modelVersion>4.0.0</modelVersion>

  <groupId>org.jbpm</groupId>

  <artifactId>jbpm-maven-example</artifactId>

  <name>jBPM Maven Project</name>

  <version>1.0-SNAPSHOT</version>


  <repositories>

    <!--  use this repository for stable releases -->

    <repository>

      <id>jboss-public-repository-group</id>

      <name>JBoss Public Maven Repository Group</name>

      <url>https://repository.jboss.org/nexus/content/groups/public/</url>

      <layout>default</layout>

      <releases>

        <enabled>true</enabled>

        <updatePolicy>never</updatePolicy>

      </releases>

      <snapshots>

        <enabled>false</enabled>

      </snapshots>

    </repository>

    <!-- use this repository for snapshot releases -->

    <repository>

      <id>jboss-snapshot-repository-group</id>

      <name>JBoss SNAPSHOT Maven Repository Group</name>

      <url>https://repository.jboss.org/nexus/content/repositories/snapshots/</url>

      <layout>default</layout>

      <releases>

        <enabled>false</enabled>

      </releases>

      <snapshots>

        <enabled>true</enabled>

        <updatePolicy>never</updatePolicy>

      </snapshots>

    </repository>


  </repositories>


  <dependencies>

    <dependency>

      <groupId>org.jbpm</groupId>

      <artifactId>jbpm-bpmn2</artifactId>

      <version>5.0.0</version>

    </dependency>

  </dependencies>


</project>

To use this as the basis for your project in Eclipse, either use M2Eclipse or use "mvn eclipse:eclipse" to generate eclipse .project and .classpath files based on this pom.

18.2. OSGi

All core jbpm jars (and core dependencies) are OSGi-enabled. That means that they contain MANIFEST.MF files (in the META-INF directory) that describe their dependencies etc. These manifest files are automatically generated by the build. You can plug these jars directly into an OSGi environment.
OSGi is a dynamic module system for declarative services. So what does that mean? Each jar in OSGi is called a bundle and has it's own Classloader. Each bundle specifies the packages it exports (makes publicly available) and which packages it imports (external dependencies). OSGi will use this information to wire the classloaders of different bundles together; the key distinction is you don't specify what bundle you depend on, or have a single monolithic classpath, instead you specify your package import and version and OSGi attempts to satisfy this from available bundles.
It also supports side by side versioning, so you can have multiple versions of a bundle installed and it'll wire up the correct one. Further to this Bundles can register services for other bundles to use. These services need initialisation, which can cause ordering problems - how do you make sure you don't consume a service before its registered? OSGi has a number of features to help with service composition and ordering. The two main ones are the programmatic ServiceTracker and the xml based Declarative Services. There are also other projects that help with this; Spring DM, iPOJO, Gravity.
The following jBPM jars are OGSi-enabled:
  • jbpm-flow
  • jbpm-flow-builder
  • jbpm-bpmn2
For example, the following code example shows how you can look up the necessary services in an OSGi environment using the service registry and create a session that can then be used to start processes, signal events, etc.

ServiceReference serviceRef = 
bundleContext.getServiceReference( ServiceRegistry.class.getName() );
ServiceRegistry registry = 
(ServiceRegistry) bundleContext.getService( serviceRef );

KnowledgeBuilderFactoryService knowledgeBuilderFactoryService = 
registry.get( KnowledgeBuilderFactoryService.class );
KnowledgeBaseFactoryService knowledgeBaseFactoryService =
 registry.get( KnowledgeBaseFactoryService.class );
ResourceFactoryService resourceFactoryService =
 registry.get( ResourceFactoryService.class );

KnowledgeBaseConfiguration kbaseConf = 
knowledgeBaseFactoryService.newKnowledgeBaseConfiguration( null, 
getClass().getClassLoader() );

KnowledgeBuilderConfiguration kbConf = 
knowledgeBuilderFactoryService.newKnowledgeBuilderConfiguration( null,
 getClass().getClassLoader() );
KnowledgeBuilder kbuilder =
 knowledgeBuilderFactoryService.newKnowledgeBuilder( kbConf ); 
 
kbuilder.add( resourceFactoryService.newClassPathResource( "MyProcess.bpmn",
 Dummy.class ), ResourceType.BPMN2 );

kbaseConf = 
knowledgeBaseFactoryService.newKnowledgeBaseConfiguration( null,
 getClass().getClassLoader() );
KnowledgeBase kbase = knowledgeBaseFactoryService.newKnowledgeBase( kbaseConf );
kbase.addKnowledgePackages( kbuilder.getKnowledgePackages() );

StatefulKnowledgeSession ksession = kbase.newStatefulKnowledgeSession();


For more information follow my Tutorial  online @ http://jbpmmaster.blogspot.com/ 
jBPM - Process Flexibilty

Chapter 17. Flexible Processes

Case management and its relation to BPM is a hot topic nowadays. There definitely seems to be a growing need amongst end users for more flexible and adaptive business processes, without ending up with overly complex solutions. Everyone seems to agree that using a process-centric approach only in many cases leads to complex solutions that are hard to maintain. The "knowledge workers" no longer want to be locked into rigid processes but wants to have the power and flexibility to regain more control over the process themselves.
The term case management is often used in that context. Without trying to give a precise definition of what it might or might not mean, as this has been a hot topic for discussion, it refers to the basic idea that many applications in the real world cannot really be described completely from start to finish (including all possible paths, deviations, exceptions, etc.). Case management takes a different approach: instead of trying to model what should happen from start to finish, let's give the end user the flexibility to decide what should happen at runtime. In its most extreme form for example, case management doesn't even require any process definition at all. Whenever a new case comes in, the end user can decide what to do next based on all the case data.
A typical example can be found in healthcare (clinical decision support to be more precise), where care plans can be used to describe how patients should be treated in specific circumstances, but people like general practitioners still need to have the flexibility to add additional steps and deviate from the proposed plan, as each case is unique. And there are similar examples in claim management, helpdesk support, etc.
So, should we just throw away our BPM system then? No! Even at its most extreme form (where we don't model any process up front), you still need a lot of the other features a BPM system (usually) provides: there still is a clear need for audit logs, monitoring, coordinating various services, human interaction (e.g. using task forms), analysis, etc. And, more importantly, many cases are somewhere in between, or might even evolve from case management to more structured business process over time (when we for example try to extract common approaches from many cases). If we can offer flexibility as part of our processes, can't we let the users decide how and where they would like to apply it?
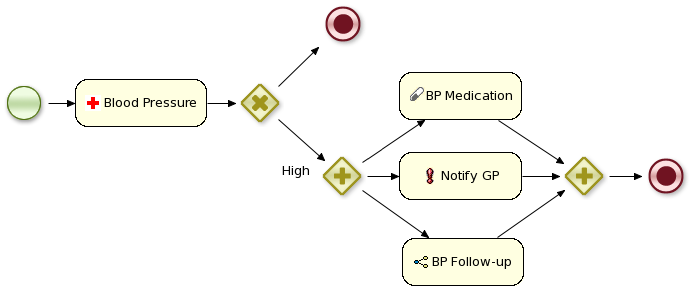
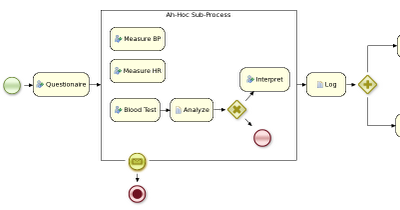
Let me give you two examples that show how you can add more and more flexibility to your processes. The first example shows a care plan that shows the tasks that should be performed when a patient has high blood pressure. While a large part of the process is still well-structured, the general practitioner can decide himself which tasks should be performed as part of the sub-process. And he also has the ability to add new tasks during that period, tasks that were not defined as part of the process, or repeat tasks multiple times, etc. The process uses an ad-hoc sub-process to model this kind of flexibility, possibly augmented with rules or event processing to help in deciding which fragments to execute.

Figure 17.1

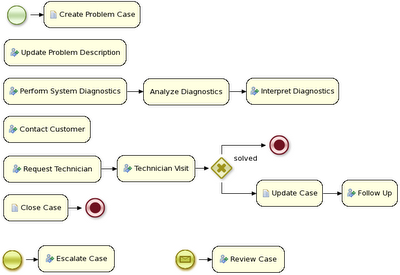
The second example actually goes a lot further than that. In this example, an internet provider could define how cases about internet connectivity problems will be handled by the internet provider. There are a number of actions the case worker can select from, but those are simply small process fragments. The case worker is responsible for selecting what to do next and can even add new tasks dynamically. As you can see, there is not process from start to finish anymore, but the user is responsible for selecting which process fragments to execute.

Figure 17.2

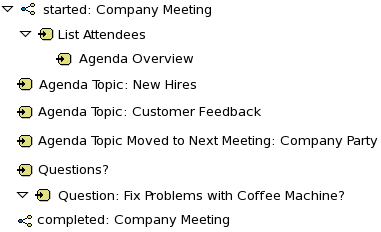
And in its most extreme form, we even allow you to create case instances without a process definition, where what needs to be performed is selected purely at runtime. This however doesn't mean you can't figure out anymore what 's actually happening. For example, meetings can be very adhoc and dynamic, but we usually want a log of what was actually discussed. The following screenshot shows how our regular audit view can still be used in this case, and the end user could then for example get a lot more info about what actually happened by looking at the data associated with each of those steps. And maybe, over time, we can even automate part of that by using a semi-structured process.

Figure 17.3


For more information follow my Tutorial  online @ http://jbpmmaster.blogspot.com/ 
jBPM - Business Activity Monitoring

Chapter 16. Business Activity Monitoring

16.1. Reporting
16.2. Direct Intervention
You need to actively monitor your processes to make sure you can detect any anomalies and react to unexpected events as soon as possible. Business Activity Monitoring (BAM) is concerned with real-time monitoring of your processes and the option of intervening directly, possibly even automatically, based on the analysis of these events.
jBPM allows users to define reports based on the events generated by the process engine, and possibly direct intervention in specific situations using complex event processing rules (Drools Fusion), as described in the next two sections. Future releases of the jBPM platform will include support for all requirements of Business Activity Monitoring, including a web-based application that can be used to more easily interact with a running process engine, inspect its state, generate reports, etc.

16.1. Reporting

By adding a history logger to the process engine, all relevent events are stored in the database. This history log can be used to monitor and analyze the execution of your processes. We are using the Eclipse BIRT (Business Intelligence Reporting Tool) to create reports that show the key performance indicators. Its easy to define your own reports yourself, using the predefined data sets containing all process history information, and any other data sources you might want to add yourself.
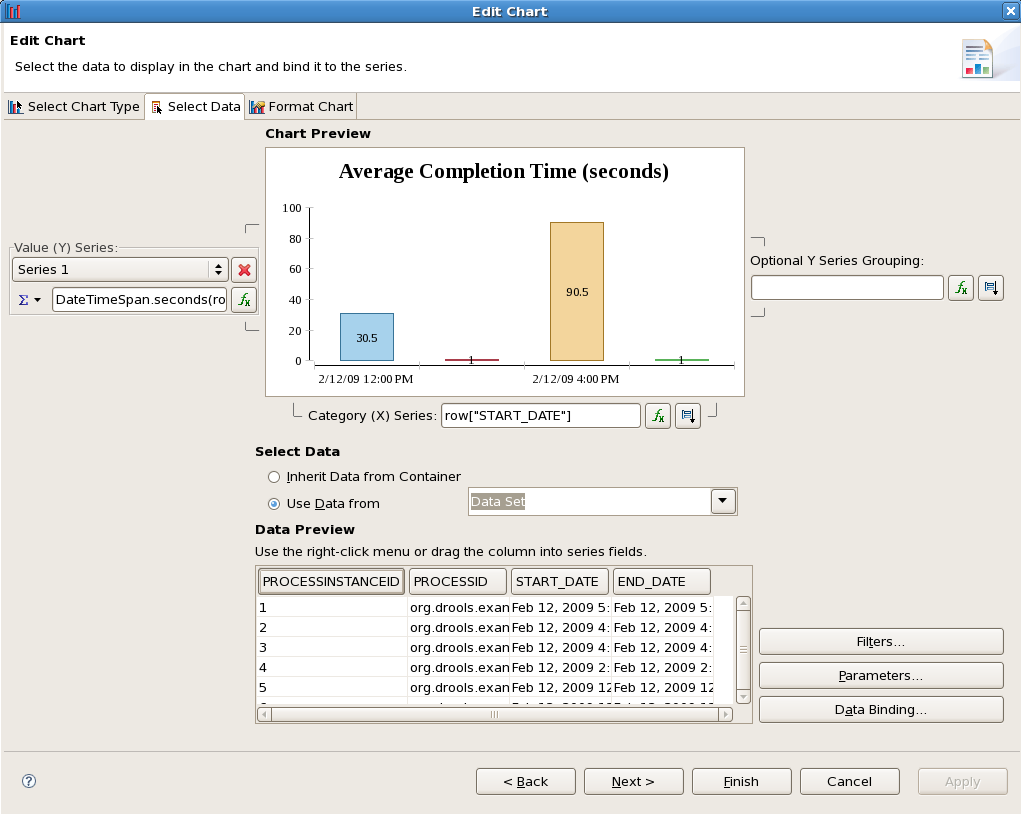
The Eclipse BIRT framework allows you to define data sets, create reports, include charts, preview your reports, and export them on web pages. (Consult the Eclipse BIRT documentation on how to define your own reports.) The following screen shot shows a sample on how to create such a chart.
Creating a report using Eclipse BIRT
Figure 16.1. Creating a report using Eclipse BIRT

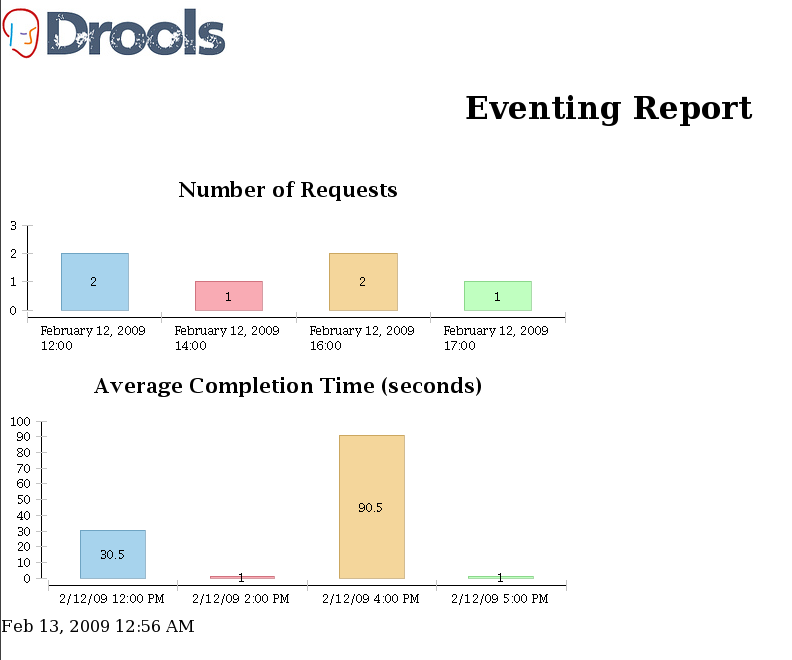
The next figure displays a simple report based on some history data, showing the number of requests per hour and the average completion time of the request during that hour. These charts could be used to check for an unexpected drop or rise of requests, an increase in the average processing time, etc. These charts could signal possible problems before the situation really gets out of hand.
The eventing report
Figure 16.2. The eventing report

16.2. Direct Intervention

Reports can be used to visualize an overview of the current state of your processes, but they rely on a human actor to take action based on the information in these charts. However, we allow users to define automatic responses to specific circumstances.
Drools Fusion provides numerous features that make it easy to process large sets of events. This can be used to monitor the process engine itself. This can be achieved by adding a listener to the engine that forwards all related process events, such as the start and completion of a process instance, or the triggering of a specific node, to a session responsible for processing these events. This could be the same session as the one executing the processes, or an independent session as well. Complex Event Processing (CEP) rules could then be used to specify how to process these events. For example, these rules could generate higher-level business events based on a specific occurrence of low-level process events. The rules could also specify how to respond to specific situations.
The next section shows a sample rule that accumulates all start process events for one specific order process over the last hour, using the "sliding window" support. This rule prints out an error message if more than 1000 process instances were started in the last hour (e.g., to detect a possible overload of the server). Note that, in a realistic setting, this would probably be replaced by sending an email or other form of notification to the responsible instead of the simple logging.
 
 
declare ProcessStartedEvent
    @role( event )
end

dialect "mvel"

rule "Number of process instances above threshold"
when
  Number( nbProcesses : intValue > 1000 )
    from accumulate(
      e: ProcessStartedEvent( processInstance.processId
                          == "com.sample.order.OrderProcess" )
      over window:size(1h),
      count(e) )
then
  System.err.println( "WARNING: Number of order processes in the last hour above 
1000: " + nbProcesses );
end
 
 
These rules could even be used to alter the behavior of a process automatically at runtime, based on the events generated by the engine. For example, whenever a specific situation is detected, additional rules could be added to the Knowledge Base to modify process behavior. For instance, whenever a large amount of user requests within a specific time frame are detected, an additional validation could be added to the process, enforcing some sort of flow control to reduce the frequency of incoming requests. There is also the possibility of deploying additional logging rules as the consequence of detecting problems. As soon as the situtation reverts back to normal, such rules would be removed again.


For more information follow my Tutorial  online @ http://jbpmmaster.blogspot.com/ 
jBPM - Process Repository

Chapter 15. Process Repository

A process repository is an important part of your BPM architecture if you start using more and more business processes in your applications and especially if you want to have the ability to dynamically update them. The process repository is the location where you store and manage your business processes. Because they are not deployed as part of your application, they have their own life cycle, meaning you can update your business processes dynamically, without having to change the application code.
Note that a process repository is a lot more than simply a database to store your process definitions. It almost acts as a combination of a source code management system, content management system, collaboration suite and development and testing environment. These are the kind of features you can expect from a process repository:
  • Persistent storage of your processes so the latest version can always easily be accessed from anywhere, including versioning
  • Build and deploy selected processes
  • User-friendly (web-based) interface to manage, update and deploy your processes (targeted to business users, not just developers)
  • Authentication / authorization to make sure only people that have the right role can see and/or edit your processes
  • Categorization and searching
  • Scenario testing to make sure you don't break anything when you change your process
  • Collaboration and other social features like comments, notifications on change, etc.
  • Synchronization with your development environment
Actually, it would be better to talk about a knowledge repository, as the repository will not only store your process definitions, but possibly also other related artefacts like task forms, your domain model, associated business rules, etc. Luckily, we don't have to reinvent the wheel for this, as the Guvnor project acts as a generic knowledge repository to store any type of artefacts and already supports most of these features.
The following screencast shows how you can upload your process definition to Guvnor, along with the process form (that is used when you try to start a new instance of that process to collect the necessary data), task forms (for the human tasks inside the process), and the process image (that can be annotated to show runtime progress). The jbpm-console is configured to get all this information from Guvnor whenever necessary and show them in the console.

Figure 15.1. 

If you use the installer, that should automatically download and install the latest version of Guvnor as well. So simply deploy your assets (for example using the Guvnor Eclipse integration as shown in the screencast, also automatically installed) to Guvnor (taking some naming conventions into account, as explained below), build the package and start up the console.
The current integration with the jbpm-console uses the following naming conventions to find the artefacts it needs (though we hope to update this to something more flexible in the near future):
  • All artefacts should be deployed to the "defaultPackage" on Guvnor (as that is where the jbpm-console will be looking)
  • A process should define "defaultPackage" as the package name (otherwise you won't be able to build your package on Guvnor)
  • Don't forget to build the package on Guvnor before opening the console, as Guvnor will only publish the latest version of your processes once you build the package
  • Currently, the console will load the process definitions the first time the list of processes is requested in the console. At this point, automatic updating from guvnor when the package is rebuilt is turned off by default, so you will have to either configure this or restart the application server to get the latest versions.
  • Task forms that should be associated with a specific process definition should have the name "{processDefinitionId}.ftl"
  • Task forms for a specific human task should have the name "{taskName}.ftl"
  • The process diagram for a specific process should have the name "{processDefinitionId}-image.png"
If you follow these rules, your processes, forms and images should show up without any issues in the jbpm-console.


For more information follow my Tutorial  online @ http://jbpmmaster.blogspot.com/ 
jBPM - Testing and Debugging Process

Chapter 14. Testing and debugging

14.1. Unit testing
14.1.1. Helper methods to create your session
14.1.2. Assertions
14.1.3. Testing integration with external services
14.1.4. Configuring persistence
14.2. Debugging
14.2.1. The Process Instances View
14.2.2. The Human Task View
14.2.3. The Audit View
Even though business processes aren't code (we even recommend you to make them as high-level as possible and to avoid adding implementation details), they also have a life cycle like other development artefacts. And since business processes can be updated dynamically, testing them (so that you don't break any use cases when doing a modification) is really important as well.

14.1. Unit testing

When unit testing your process, you test whether the process behaves as expected in specific use cases, for example test the output based on the existing input. To simplify unit testing, jBPM includes a helper class called JbpmJUnitTestCase (in the jbpm-bpmn2 test module) that you can use to greatly simplify your junit testing, by offering:
  • helper methods to create a new knowledge base and session for a given (set of) process(es)
    • you can select whether you want to use persistence or not
  • assert statements to check
    • the state of a process instance (active, completed, aborted)
    • which node instances are currently active
    • which nodes have been triggered (to check the path that has been followed)
    • get the value of variables
    • etc.
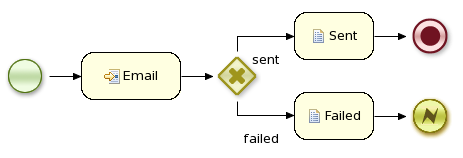
For example, conside the following hello world process containing a start event, a script task and an end event. The following junit test will create a new session, start the process and then verify whether the process instance completed successfully and whether these three nodes have been executed.
public class MyProcessTest extends JbpmJUnitTestCase {


   public void testProcess() {

       // create your session and load the given process(es)

       StatefulKnowledgeSession ksession = createKnowledgeSession("sample.bpmn");

       // start the process

       ProcessInstance processInstance = 
          ksession.startProcess("com.sample.bpmn.hello");

       // check whether the process instance has completed successfully

       assertProcessInstanceCompleted(processInstance.getId(), ksession);

       // check whether the given nodes were executed during the process execution

       assertNodeTriggered(processInstance.getId(), 
                       "StartProcess", "Hello", "EndProcess");

   }

}

14.1.1. Helper methods to create your session

Several methods are provided to simplify the creation of a knowledge base and a session to interact with the engine.
  • createKnowledgeBase(String... process): Returns a new knowledge base containing all the processes in the given filenames (loaded from classpath)
  • createKnowledgeBase(Map<String, ResourceType> resources) :Returns a new knowledge base containing all the resources (not limited to processes but possibly also including other resource types like rules, decision tables, etc.) from the given filenames (loaded from classpath)
  • createKnowledgeBaseGuvnor(String... packages): Returns a new knowledge base containing all the processes loaded from Guvnor (the process repository) from the given packages
  • createKnowledgeSession(KnowledgeBase kbase): Creates a new statefull knowledge session from the given knowledge base
  • restoreSession(StatefulKnowledgeSession ksession, boolean noCache) : completely restores this session from database, can be used to recreate a session to simulate a critical failure and to test recovery, if noCache is true, the existing persistence cache will not be used to restore the data

14.1.2. Assertions

The following assertions are added to simplify testing the current state of a process instance:
  • assertProcessInstanceActive(long processInstanceId, StatefulKnowledgeSession ksession): check whether the process instance with the given id is still active
  • assertProcessInstanceCompleted(long processInstanceId, StatefulKnowledgeSession ksession): check whether the process instance with the given id has completed successfully
  • assertProcessInstanceAborted(long processInstanceId, StatefulKnowledgeSession ksession): check whether the process instance with the given id was aborted
  • assertNodeActive(long processInstanceId, StatefulKnowledgeSession ksession, String... name): check whether the process instance with the given id contains at least one active node with the given node name (for each of the given names)
  • assertNodeTriggered(long processInstanceId, String... nodeNames) : check for each given node name whether a node instance was triggered (but not necessarily active anymore) during the execution of the process instance with the given
  • getVariableValue(String name, long processInstanceId, StatefulKnowledgeSession ksession): retrieves the value of the variable with the given name from the given process instance, can then be used to check the value of process variables

14.1.3. Testing integration with external services

Real-life business processes typically include the invocation of external services (like for example a human task service, an email server or your own domain-specific services). One of the advantages of our domain-specific process approach is that you can specify yourself how to actually execute your own domain-specific nodes, by registering a handler. And this handler can be different depending on your context, allowing you to use testing handlers for unit testing your process. When you are unit testing your business process, you can register test handlers that then verify whether specific services are requested correctly, and provide test responses for those services. For example, imagine you have an email node or a human task as part of your process. When unit testing, you don't want to send out an actual email but rather test whether the email that is requested contains the correct information (for example the right to email, a personalized body, etc.).
A TestWorkItemHandler is provided by default that can be registered to collect all work items (a work item represents one unit of work, like for example sending one specific email or invoking one specific service and contains all the data related to that task) for a given type. This test handler can then be queried during unit testing to check whether specific work was actually requested during the execution of the process and that the data associcated with the work was correct.
The following example describes how a process that sends out an email could be tested. This test case in particular will test whether an exception is raised when the email could not be sent (which is simulated by notifying the engine that the sending the email could not be completed). The test case uses a test handler that simply registers when an email was requested (and allows you to test the data related to the email like from, to, etc.). Once the engine has been notified the email could not be sent (using abortWorkItem(..)), the unit test verifies that the process handles this case successfully by logging this and generating an error, which aborts the process instance in this case.
public void testProcess2() {

    // create your session and load the given process(es)

    StatefulKnowledgeSession ksession = createKnowledgeSession("sample2.bpmn");

    // register a test handler for "Email"

    TestWorkItemHandler testHandler = new TestWorkItemHandler();

    ksession.getWorkItemManager().registerWorkItemHandler("Email", testHandler);

    // start the process

    ProcessInstance processInstance = 
ksession.startProcess("com.sample.bpmn.hello2");

    assertProcessInstanceActive(processInstance.getId(), ksession);

    assertNodeTriggered(processInstance.getId(), "StartProcess", "Email");

    // check whether the email has been requested

    WorkItem workItem = testHandler.getWorkItem();

    assertNotNull(workItem);

    assertEquals("Email", workItem.getName());

    assertEquals("me@mail.com", workItem.getParameter("From"));

    assertEquals("you@mail.com", workItem.getParameter("To"));

    // notify the engine the email has been sent

    ksession.getWorkItemManager().abortWorkItem(workItem.getId());

    assertProcessInstanceAborted(processInstance.getId(), ksession);

    assertNodeTriggered(processInstance.getId(), "Gateway", "Failed", "Error");

}

14.1.4. Configuring persistence

You can configure whether you want to execute the junit tests using persistence or not. By default, the junit tests will use persistence, meaning that the state of all process instances will be stored in a (in-memory H2) database (which is started by the junit test during setup) and a history log will be used to check assertions related to execution history. When persistence is not used, process instances will only live in memory and an in-memory logger is used for history assertions.
By default, persistence is turned on. To turn off persistence, simply pass a boolean to the super constructor when creating your test case, as shown below:
public class MyProcessTest extends JbpmJUnitTestCase {


    public MyProcessTest() {

        // configure this tests to not use persistence in this case

        super(false);

    }


    ...

14.2. Debugging

This section describes how to debug processes using the Eclipse plugin. This means that the current state of your running processes can be inspected and visualized during the execution. Note that we currently don't allow you to put breakpoints on the nodes within a process directly. You can however put breakpoints inside any Java code you might have (i.e. your application code that is invoking the engine or invoked by the engine, listeners, etc.) or inside rules (that could be evaluated in the context of a process). At these breakpoints, you can then inspect the internal state of all your process instances.
When debugging the application, you can use the following debug views to track the execution of the process:
  1. The process instances view, showing all running process instances (and their state). When double-clicking a process instance, the process instance view visually shows the current state of that process instance at that point in time.
  2. The human task view, showing the task list of the given user (fill in the user id of the actor and click refresh to view all the tasks for the given actor), where you can then control the life cycle of the task, for example start and complete it.
  3. The audit view, showing the audit log (note that you should probably use a threaded file logger if you want to session to save the audit event to the file system on regular intervals, so the audit view can be update to show the latest state).
  4. The global data view, showing the globals.
  5. Other views related to rule execution like the working memory view (showing the contents (data) in the working memory related to rule execution), the agenda view (showing all activated rules), etc.

14.2.1. The Process Instances View

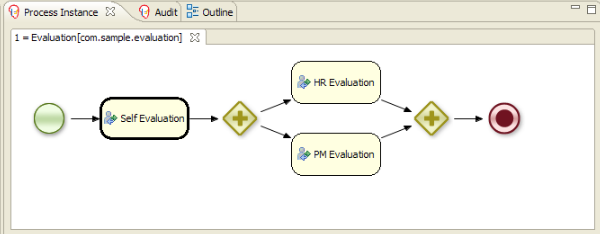
The process instances view shows the currently running process instances. The example shows that there is currently one running process (instance), currently executing one node instance, i.e. business rule task. When double-clicking a process instance, the process instance viewer will graphically show the progress of the process instance. An example where the process instance is waiting for a human actor to perform a self-evaluation task is shown below.


When you double-click a process instance in the process instances view and the process instance view complains that it cannot find the process, this means that the plugin wasn't able to find the process definition of the selected process instance in the cache of parsed process definitions. To solve this, simply change the process definition in question and save again (so it will be parsed) or rebuild the project that contains the process definition in question.


14.2.2. The Human Task View

The Human Task View can connect to a running human task service and request the relevant tasks for a particular user (i.e. the tasks where the user is either a potential owner or the tasks that the user already claimed and is executing). The life cycle of these tasks can then be executed, i.e. claiming or releasing a task, starting or stopping the execution of a task, completing a task, etc. A screenshot of this Human Task View is shown below. You can configure which task service to connect to in the Drools Task preference page (select Window -> Preferences and select Drools Task). Here you can specify the url and port (default = 127.0.0.1:9123).

14.2.3. The Audit View

The audit view, showing the audit log, which is a log of all events that were logged from the session. To create a logger, use the KnowledgeRuntimeLoggerFactory to create a new logger and attach it to a session. Note that you should probably use a threaded file logger if you want to session to save the audit event to the file system on regular intervals, so the audit view can be update to show the latest state. When creating a threaded file logger, you can specify the name of the file where the audit log should be created and the interval after which event should be saved to the file (in milliseconds). Be sure to close the logger after usage.
KnowledgeRuntimeLogger logger = KnowledgeRuntimeLoggerFactory

   .newThreadedFileLogger(ksession, "logdir/mylogfile", 1000);

// do something with the session here

logger.close();

      
To open up an audit tree in the audit view, open the selected log file in the audit view or simply drag the file into the audit view. A tree-based view is generated based on the audit log. An event is shown as a subnode of another event if the child event is caused by (a direct consequence of) the parent event. An example is shown below.


For more information follow my Tutorial  online @ http://jbpmmaster.blogspot.com/ 
jBPM - Domain Specific Processes

Chapter 13. Domain-specific processes

13.1. Introduction
13.2. Example: Notifications
13.2.1. Creating the work definition
13.2.2. Registering the work definition
13.2.3. Using your new work item in your processes
13.2.4. Executing service nodes

13.1. Introduction

One of the goals of jBPM is to allow users to extend the default process constructs with domain-specific extensions that simplify development in a particular application domain. This tutorial describes how to take your first steps towards domain-specific processes. Note that you don't need to be a jBPM expert to define your own domain-specific nodes, this should be considered integration code that a normal developer with some experience in jBPM can do himself.
Most process languages offer some generic action (node) construct that allows plugging in custum user actions. However, these actions are usually low-level, where the user is required to write custom code to implement the work that should be incorporated in the process. The code is also closely linked to a specific target environment, making it difficult to reuse the process in different contexts.
Domain-specific languages are targeted to one particular application domain and therefore can offer constructs that are closely related to the problem the user is trying to solve. This makes the processes and easier to understand and self-documenting. We will show you how to define domain-specific work items (also called service nodes), which represent atomic units of work that need to be executed. These service nodes specify the work that should be executed in the context of a process in a declarative manner, i.e. specifying what should be executed (and not how) on a higher level (no code) and hiding implementation details.
So we want service nodes that are:
  1. domain-specific
  2. declarative (what, not how)
  3. high-level (no code)
  4. customizable to the context
Users can easily define their own set of domain-specific service nodes and integrate them in our process language. For example, the next figure shows an example of a process in a healthcare context. The process includes domain-specific service nodes for ordering nursing tasks (e.g. measuring blood pressure), prescribing medication and notifying care providers.

13.2. Example: Notifications

Let's start by showing you how to include a simple work item for sending notifications. A work item represent an atomic unit of work in a declarative way. It is defined by a unique name and additional parameters that can be used to describe the work in more detail. Work items can also return information after they have been executed, specified as results. Our notification work item could thus be defined using a work definition with four parameters and no results:
  Name: "Notification"
  Parameters
  From [String]
  To [String]
  Message [String]
  Priority [String]

13.2.1. Creating the work definition

All work definitions must be specified in one or more configuration files in the project classpath, where all the properties are specified as name-value pairs. Parameters and results are maps where each parameter name is also mapped to the expected data type. Note that this configuration file also includes some additional user interface information, like the icon and the display name of the work item.
In our example we will use MVEL for reading in the configuration file, which allows us to do more advanced configuration files. This file must be placed in the project classpath in a directory called META-INF. Our MyWorkDefinitions.wid file looks like this:
import org.drools.process.core.datatype.impl.type.StringDataType;
[
  // the Notification work item
  [
    "name" : "Notification",
    "parameters" : [
      "Message" : new StringDataType(),
      "From" : new StringDataType(),
      "To" : new StringDataType(),
      "Priority" : new StringDataType(),
    ],
    "displayName" : "Notification",
    "icon" : "icons/notification.gif"
  ]

]
The project directory structure could then look something like this:
project/src/main/resources/META-INF/MyWorkDefinitions.wid
You might now want to create your own icons to go along with your new work definition. To add these you will need .gif or .png images with a pixel size of 16x16. Place them in a directory outside of the META-INF directory, for example as follows:
project/src/main/resources/icons/notification.gif

13.2.2. Registering the work definition

The configuration API can be used to register work definition files for your project using the drools.workDefinitions property, which represents a list of files containing work definitions (separated usings spaces). For example, include a drools.rulebase.conf file in the META-INF directory of your project and add the following line:
  drools.workDefinitions = MyWorkDefinitions.wid
This will replace the default domain specific node types EMAIL and LOG with the newly defined NOTIFICATION node in the process editor. Should you wish to just add a newly created node definition to the existing palette nodes, adjust the drools.workDefinitions property as follows including the default set configuration file:
  drools.workDefinitions = MyWorkDefinitions.conf WorkDefinitions.conf

13.2.3. Using your new work item in your processes

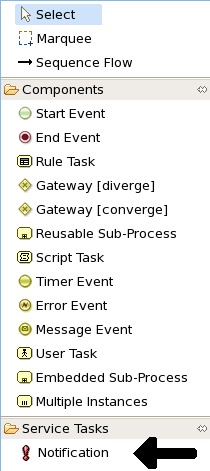
Once our work definition has been created and registered, we can start using it in our processes. The process editor contains a separate section in the palette where the different service nodes that have been defined for the project appear.
Using drag and drop, a notification node can be created inside your process. The properties can be filled in using the properties view.
Apart from the properties defined by for this work item, all work items also have these three properties:
  1. Parameter Mapping: Allows you map the value of a variable in the process to a parameter of the work item. This allows you to customize the work item based on the current state of the actual process instance (for example, the priority of the notification could be dependent of some process-specific information).
  2. Result Mapping: Allows you to map a result (returned once a work item has been executed) to a variable of the process. This allows you to use results in the remainder of the process.
  3. Wait for completion: By default, the process waits until the requested work item has been completed before continuing with the process. It is also possible to continue immediately after the work item has been requested (and not waiting for the results) by setting "wait for completion" to false.
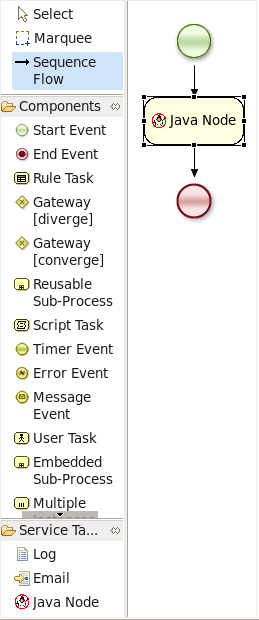
Here is an example that creates a domain specific node to execute Java, asking for the class and method parameters. It includes a custom java.gif icon and consists of the following files and resulting screenshot:
import org.drools.process.core.datatype.impl.type.StringDataType;
[
  // the Java Node work item located in:
  // project/src/main/resources/META-INF/JavaNodeDefinition.conf
  [
    "name" : "JavaNode",
    "parameters" : [
      "class" : new StringDataType(),
      "method" : new StringDataType(),
    ],
    "displayName" : "Java Node",
    "icon" : "icons/java.gif"
  ]

]
// located in: project/src/main/resources/META-INF/drools.rulebase.conf
//
  drools.workDefinitions = JavaNodeDefinition.conf WorkDefinitions.conf

// icon for java.gif located in:
// project/src/main/resources/icons/java.gif

13.2.4. Executing service nodes

The jBPM engine contains a WorkItemManager that is responsible for executing work items whenever necessary. The WorkItemManager is responsible for delegating the work items to WorkItemHandlers that execute the work item and notify the WorkItemManager when the work item has been completed. For executing notification work items, a NotificationWorkItemHandler should be created (implementing the WorkItemHandler interface):
package com.sample;


import org.drools.runtime.process.WorkItem;

import org.drools.runtime.process.WorkItemHandler;

import org.drools.runtime.process.WorkItemManager;


public class NotificationWorkItemHandler implements WorkItemHandler {


  public void executeWorkItem(WorkItem workItem, WorkItemManager manager) {

    // extract parameters

    String from = (String) workItem.getParameter("From");

    String to = (String) workItem.getParameter("To");

    String message = (String) workItem.getParameter("Message");

    String priority = (String) workItem.getParameter("Priority");

    // send email

    EmailService service = ServiceRegistry.getInstance().getEmailService();

    service.sendEmail(from, to, "Notification", message);

    // notify manager that work item has been completed

    manager.completeWorkItem(workItem.getId(), null);

  }


  public void abortWorkItem(WorkItem workItem, WorkItemManager manager) {

    // Do nothing, notifications cannot be aborted

  }


}
This WorkItemHandler sends a notification as an email and then immediate notifies the WorkItemManager that the work item has been completed. Note that not all work items can be completed directly. In cases where executing a work item takes some time, execution can continue asynchronously and the work item manager can be notified later. In these situations, it might also be possible that a work item is being aborted before it has been completed. The abort method can be used to specify how to abort such work items.
WorkItemHandlers should be registered at the WorkItemManager, using the following API:
ksession.getWorkItemManager().registerWorkItemHandler(

    "Notification", new NotificationWorkItemHandler());
Decoupling the execution of work items from the process itself has the following advantages:
  1. The process is more declarative, specifying what should be executed, not how.
  2. Changes to the environment can be implemented by adapting the work item handler. The process itself should not be changed. It is also possible to use the same process in different environments, where the work item handler is responsible for integrating with the right services.
  3. It is easy to share work item handlers across processes and projects (which would be more difficult if the code would be embedded in the process itself).
  4. Different work item handlers could be used depending on the context. For example, during testing or simulation, it might not be necessary to actually execute the work items. In this case specialized dummy work item handlers could be used during testing.


For more information follow my Tutorial  online @ http://jbpmmaster.blogspot.com/ 
jBPM Human Task

Chapter 12. Human Tasks

12.1. Human tasks inside processes
12.1.1. User and group assignment
12.1.2. Data mapping
12.1.3. Swimlanes
12.1.4. Examples
12.2. Human task service
12.2.1. Task life cycle
12.2.2. Linking the human task service to the jBPM engine
12.2.3. Interacting with the human task service
12.2.4. User and group assignment
12.2.5. Starting the human task service
12.3. Human task clients
12.3.1. Eclipse demo task client
12.3.2. Web-based task client in jBPM Console
An important aspect of business processes is human task management. While some of the work performed in a process can be executed automatically, some tasks need to be executed by human actors. jBPM supports a special human task node inside processes for modeling this interaction with human users. This human task node allows process designers to define the properties related to the task that the human actor needs to execute, like for example the type of task, the actor(s), the data associated with the task, etc. jBPM also includes a so-called human task service, a back-end service that manages the life cycle of these tasks at runtime. This implementation is based on the WS-HumanTask specification. Note however that this implementation is fully pluggable, meaning that users can integrate their own human task solution if necessary.
To have human actors participate in your processes, you first need to (1) include human task nodes inside your process to model the interaction with human actors, (2) integrate a task management component (like for example the WS-HumanTask based implementation provided by jBPM) and (3) have end users interact with a human task client to request their task list and claim and complete the tasks assigned to them. Each of these three elements will be discussed in more detail in the next sections.

12.1. Human tasks inside processes

jBPM supports the use of human tasks inside processes using a special user task node (as shown in the figure above). A user task node represents an atomic task that needs to be executed by a human actor. [Although jBPM has a special user task node for including human tasks inside a process, human tasks are considered the same as any other kind of external service that needs to be invoked and are therefore simply implemented as a domain-specific service. Check out the chapter on domain-specific services to learn more about how to register your own domain-specific services.]
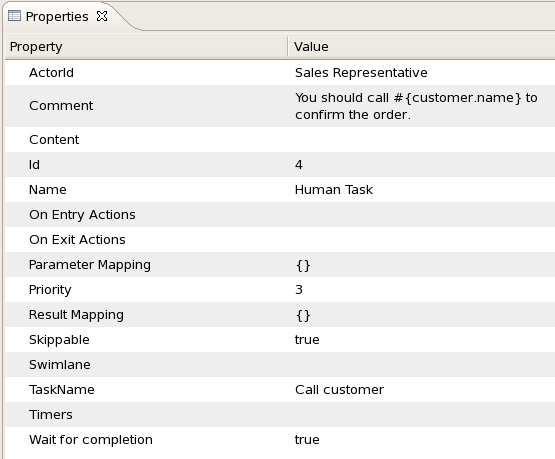
A user task node contains the following properties:
  • Id: The id of the node (which is unique within one node container).
  • Name: The display name of the node.
  • TaskName: The name of the human task.
  • Priority: An integer indicating the priority of the human task.
  • Comment: A comment associated with the human task.
  • ActorId: The actor id that is responsible for executing the human task. A list of actor id's can be specified using a comma (',') as separator.
  • GroupId: The group id that is responsible for executing the human task. A list of group id's can be specified using a comma (',') as separator.
  • Skippable: Specifies whether the human task can be skipped, i.e., whether the actor may decide not to execute the task.
  • Content: The data associated with this task.
  • Swimlane: The swimlane this human task node is part of. Swimlanes make it easy to assign multiple human tasks to the same actor. See the human tasks chapter for more detail on how to use swimlanes.
  • On entry and on exit actions: Action scripts that are executed upon entry and exit of this node, respectively.
  • Parameter mapping: Allows copying the value of process variables to parameters of the human task. Upon creation of the human tasks, the values will be copied.
  • Result mapping: Allows copying the value of result parameters of the human task to a process variable. Upon completion of the human task, the values will be copied. A human task has a result variable "Result" that contains the data returned by the human actor. The variable "ActorId" contains the id of the actor that actually executed the task.

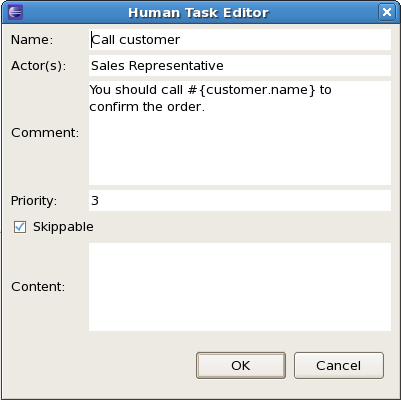
You can edit these variables in the properties view (see below) when selecting the user task node, or the most important properties can also be edited by double-clicking the user task node, after which a custom user task node editor is opened, as shown below as well.
In many cases, the parameters of a user task (like for example the task name, actorId, priority, etc.) can be defined when creating the process. You simply fill in value of these properties in the property editor. It is however likely that some of the properties of the human task are dependent on some data related to the process instance this task is being requested in. For example, if a business process is used to model how to handle incoming sales requests, tasks that are assigned to a sales representative could include information related to that specific sales request, like its unique id, the name of the customer that requested it, etc. You can make your human task properties dynamic in two ways:
  • #{expression}: Task parameters of type String can use #{expression} to embed the value of the given expression in the String. For example, the comment related to a task might be "Please review this request from user #{user}", where user is a variable in the process. At runtime, #{user} will be replaced by the actual user name for that specific process instance. The value of #{expression} will be resolved when creating human task and the #{...} will be replaced by the toString() value of the value it resolves to. The expression could simply be the name of a variable (in which case it will be resolved to the value of the variable), but more advanced MVEL expressions are possible as well, like for example #{person.name.firstname}. Note that this approach can only be used for String parameters. Other parameters should use parameter mapping to map a value to that parameter.
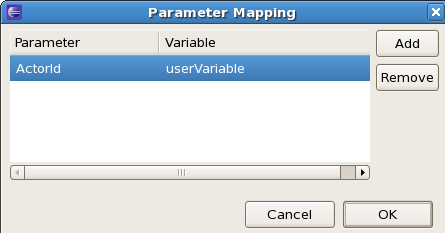
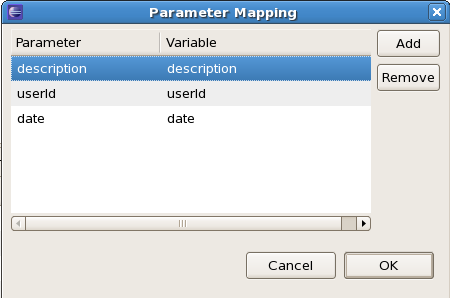
  • Parameter mapping: You can map the value of a process variable (or a value derived from a variable) to a task parameter. For example, if you need to assign a task to a user whose id is a variable in your process, you can do so by mapping that variable to the parameter ActorId, as shown in the following screenshot. [Note that, for parameters of type String, this would be identical to specifying the ActorId using #{userVariable}, so it would probably be easier to use #{expression} in this case, but parameter mapping also allow you to assign a value to properties that are not of type String.]

12.1.1. User and group assignment

Tasks can be assigned to one specific user. In that case, the task will show up on the task list of that specific user only. If a task is assigned to more than one user, any of those users can claim and execute this task.
Tasks can also be assigned to one or more groups. This means that any user that is part of the group can claim and execute the task. For more information on how user and group management is handled in the default human task service, check out the user and group assignment.

12.1.2. Data mapping

Human tasks typically present some data related to the task that needs to be performed to the actor that is executing the task and usually also request the actor to provide some result data related to the execution of the task. Task forms are typically used to present this data to the actor and request results.

12.1.2.1. Task parameters

Data that needs to be displayed in a task form should be passed to the task, using parameter mapping. Parameter mapping allows you to copy the value of a process variable to a task parameter (as described above). This could for example be the customer name that needs to be displayed in the task form, the actual request, etc. To copy data to the task, simply map the variable to a task parameter. This parameter will then be accessible in the task form (as shown later, when describing how to create task forms).
For example, the following human task (as part of the humantask example in jbpm-examples) is assigned to a sales representative that needs to decide whether to accept or reject a request from a customer. Therefore, it copies the following process variables to the task as task parameters: the userId (of the customer doing the request), the description (of the request), and the date (of the request).

12.1.2.2. Task results

Data that needs to be returned to the process should be mapped from the task back into process variables, using result mapping. Result mapping allows you to copy the value of a task result to a process variable (as described above). This could for example be some data that the actor filled in. To copy a task result to a process variable, simply map the task result parameter to the variable in the result mapping. The value of the task result will then be copied after completion of the task so it can be used in the remainder of the process.
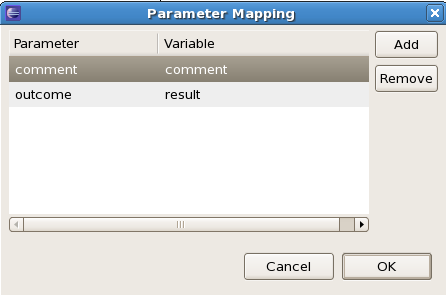
For example, the following human task (as part of the humantask example in jbpm-examples) is assigned to a sales representative that needs to decide whether to accept or reject a request from a customer. Therefore, it copies the following task results back to the process: the outcome (the decision that the sales representative has made regarding this request, in this case "Accept" or "Reject") and the comment (the justification why).

12.1.3. Swimlanes

User tasks can be used in combination with swimlanes to assign multiple human tasks to the same actor. Whenever the first task in a swimlane is created, and that task has an actorId specified, that actorId will be assigned to (all other tasks of) that swimlane as well. Note that this would override the actorId of subsequent tasks in that swimlane (if specified), so only the actorId of the first human task in a swimlane will be taken into account, all others will then take the actorId as assigned in the first one.
Whenever a human task that is part of a swimlane is completed, the actorId of that swimlane is set to the actorId that executed that human task. This allows for example to assign a human task to a group of users, and to assign future tasks of that swimlame to the user that claimed the first task. This will also automatically change the assignment of tasks if at some point one of the tasks is reassigned to another user.
To add a human task to a swimlane, simply specify the name of the swimlane as the value of the "Swimlane" parameter of the user task node. A process must also define all the swimlanes that it contains. To do so, open the process properties by clicking on the background of the process and click on the "Swimlanes" property. You can add new swimlanes there.
The new BPMN2 Eclipse editor will support a visual representation of swimlanes (as horizontal lanes), so that it will be possible to define a human task as part of a swimlane simply by dropping the task in that lane on the process model.

12.1.4. Examples

The jbpm-examples module has some examples that show human tasks in action, like the evaluation example and the humantask example. These examples show some of the more advanced features in action, like for example group assignment, data passing in and out of human tasks, swimlanes, etc. Be sure to take a look at them for more details and a working example.

12.2. Human task service

As far as the jBPM engine is concerned, human tasks are similar to any other external service that needs to be invoked and are implemented as a domain-specific service. Check out the chapter on domain-specific services for more detail on how to include a domain- specific service in your process. Because a human task is an example of such a domain- specific service, the process itself contains a high-level, abstract description of the human task that need to be executed, and a work item handler is responsible for binding this abstract tasks to a specific implementation. Using our pluggable work item handler approach, users can plug in the human task service that is provided by jBPM, as descrived below, or they may register their own implementation.
The jBPM project provide a default implementation of a human task service based on the WS-HumanTask specification. If you do not have the requirement to integrate an existing human task service, you can use this service. It manages the life cycle of the tasks (creation, claiming, completion, etc.) and stores the state of all the tasks, task lists, etc. It also supports features like internationalization, calendar integration, different types of assignments, delegation, deadlines, etc. It is implemented as part of the jbpm-human-task module.
The task service implementation is based on the WS-HumanTask (WS-HT) specification. This specification defines (in detail) the model of the tasks, the life cycle, and a lot of other features as the ones mentioned above. It is pretty comprehensive and can be found here.

12.2.1. Task life cycle

Looking from the perspective of the process, whenever a user task node is triggered during the execution of a process instance, a human task is created. The process will only leave that node when that human task has been completed or aborted.
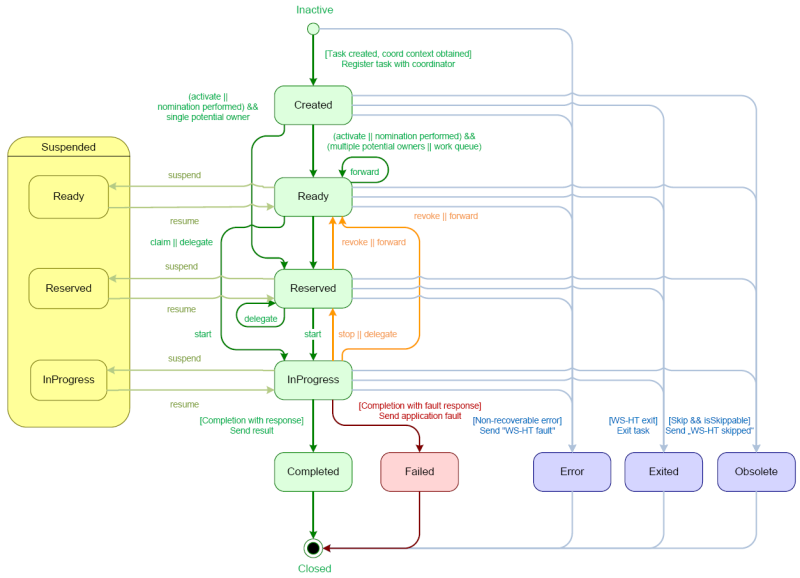
The human task itself usually has a complete life cycle itself as well. We will now shortly introduce this life cycle, as shown in the figure below. For more details, check out the WS-HumanTask specification.
Whenever a task is created, it starts in the "Created" stage. It usually automatically transfers to the "Ready" state, at which point the task will show up on the task list of all the actors that are allowed to execute the task. There, it is waiting for one of these actors to claim the task, indicating that he or she will be executing the task. Once a user has claimed a task, the status is changed to "Reserved". Note that a task that only has one potential actor will automatically be assigned to that actor upon creation of that task. After claiming the task, that user can then at some point decide to start executing the task, in which case the task status is changed to "InProgress". Finally, once the task has been performed, the user must complete the task (and can specify the result data related to the task), in which case the status is changed to "Completed". If the task could not be completed, the user can also indicate this using a fault response (possibly with fault data associated), in which case the status is changed to "Failed".
The life cycle explained above is the normal life cycle. The service also allows a lot of other life cycle methods, like:
  • Delegating or forwarding a task, in which case it is assigned to another actor
  • Revoking a task, so it is no longer claimed by one specific actor but reappears on the task list of all potential actors
  • Temporarly suspending and resuming a task
  • Stopping a task in progress
  • Skipping a task (if the task has been marked as skippable), in which case the task will not be executed

12.2.2. Linking the human task service to the jBPM engine

The human task service needs to be integrated with the jBPM engine just like any other external service, by registering a work item handler that is responsible for translating the abstract work item (in this case a human task) to a specific invocation of a service. We have implemented this work item handler (org.jbpm.process.workitem.wsht.WSHumanTaskHandler in the jbpm-human-task module), so you can register this work item handler like this:
StatefulKnowledgeSession ksession = ...;

ksession.getWorkItemManager().registerWorkItemHandler("Human Task", 
 new WSHumanTaskHandler());
 
If you are using persistence, you should use the CommandBasedWSHumanTaskHandler instead (org.jbpm.process.workitem.wsht.CommandBasedWSHumanTaskHandler in the jbpm-human-task module), like this:
StatefulKnowledgeSession ksession = ...;

ksession.getWorkItemManager().registerWorkItemHandler("Human Task", 
 new CommandBasedWSHumanTaskHandler());
 
By default, this handler will connect to the human task service on the local machine on port 9123. You can easily change the address and port of the human task service that should be used by by invoking the setConnection(ipAddress, port) method on the WSHumanTaskHandler.
The communication between the human task service and the process engine, or any task client, is done using messages being sent between the client and the server. The implementation allows different transport mechanisms being plugged in, but by default, Mina (http://mina.apache.org/) is used for client/server communication. An alternative implementation using HornetQ is also available.

12.2.3. Interacting with the human task service

The human task service exposes various methods to manage the life cycle of the tasks through a Java API. This allows clients to integrate (at a low level) with the human task service. Note that end users should probably will not interact with this low-level API directly but rather use one of the more user-friendly task clients (see below) that offer a graphical user interface to request task lists, claim and complete tasks, etc. These task clients internally interact with the human task service using this API as well. But the low-level API is also available for developers to interact with the human task service directly.
A task client (class org.jbpm.task.service.TaskClient) offers the following methods for managing the life cycle of human tasks:
public void start( long taskId, String userId, 
 TaskOperationResponseHandler responseHandler )

public void stop( long taskId, String userId, 
 TaskOperationResponseHandler responseHandler )

public void release( long taskId, String userId, 
 TaskOperationResponseHandler responseHandler )

public void suspend( long taskId, String userId, 
 TaskOperationResponseHandler responseHandler )

public void resume( long taskId, String userId, 
 TaskOperationResponseHandler responseHandler )

public void skip( long taskId, String userId, 
 TaskOperationResponseHandler responseHandler )

public void delegate( long taskId, String userId, String targetUserId,

                      TaskOperationResponseHandler responseHandler )

public void complete( long taskId, String userId, ContentData outputData,

                      TaskOperationResponseHandler responseHandler )

...
If you take a look a the method signatures you will notice that almost all of these methods take the following arguments:
  • taskId: The id of the task that we are working with. This is usually extracted from the currently selected task in the user task list in the user interface.
  • userId: The id of the user that is executing the action. This is usually the id of the user that is logged in into the application.
  • responseHandler: Communication with the task service is asynchronous, so you should use a response handler that will be notified when the results are available.
When you invoke a message on the TaskClient, a message is created that will be sent to the server, and the server will execute the logic that implements the correct action.
The following code sample shows how to create a task client and interact with the task service to create, start and complete a task.
TaskClient client = new TaskClient(new MinaTaskClientConnector("client 1",

new MinaTaskClientHandler(SystemEventListenerFactory.getSystemEventListener())));

client.connect("127.0.0.1", 9123);


// adding a task
BlockingAddTaskResponseHandler addTaskResponseHandler = 
 new BlockingAddTaskResponseHandler();

Task task = ...;

client.addTask( task, null, addTaskResponseHandler );

long taskId = addTaskResponseHandler.getTaskId();


// getting tasks for user "bobba"

BlockingTaskSummaryResponseHandler taskSummaryResponseHandler =

    new BlockingTaskSummaryResponseHandler();

client.getTasksAssignedAsPotentialOwner("bobba", "en-UK", 
 taskSummaryResponseHandler);

List<TaskSummary> tasks = taskSummaryResponseHandler.getResults();


// starting a task

BlockingTaskOperationResponseHandler responseHandler =

    new BlockingTaskOperationResponseHandler();

client.start( taskId, "bobba", responseHandler );

responseHandler.waitTillDone(1000); 


// completing a task

responseHandler = new BlockingTaskOperationResponseHandler();

client.complete( taskId, "bobba".getId(), null, responseHandler );

responseHandler.waitTillDone(1000);

12.2.4. User and group assignment

Tasks can be assigned to one specific user. In that case, the task will show up on the task list of that specific user only. If a task is assigned to more than one user, any of those users can claim and execute this task. Tasks can also be assigned to one or more groups. This means that any user that is part of the group can claim and execute the task.
The human task service needs to know what all the possible valid user and group ids are (to make sure tasks are assigned to existing users and/or groups to avoid errors and tasks that end up assigned to non-existing users). You need to make sure to register all users and groups before tasks can be assigned to them. This can be done dynamically.
EntityManagerFactory emf = Persistence.createEntityManagerFactory("org.jbpm.task");

TaskService taskService = new TaskService(emf, 
 SystemEventListenerFactory.getSystemEventListener());

TaskServiceSession taskSession = taskService.createSession();

// now register new users and groups

taskSession.addUser(new User("krisv"));

taskSession.addGroup(new Group("developers"));
The human task service itself does not maintain the relationship between users and groups. This is considered outside the scope of the human task service, as in general businesses already have existing services that contain this information (like for example an LDAP service). Therefore, the human task service also offers you to specify the list of groups that a user is part of, so this information can also be taken into account when for example requesting the task list or claiming a task.
For example, if a task is assigned to the group "sales" and the user "sales-rep" that is part of that group wants to claim that task, he should pass the fact that he is part of that group when requesting the list of tasks that he is assigned to as potential owner:
List<String> groups = new ArrayList<String>();

groups.add("sales");

taskClient.getTasksAssignedAsPotentialOwner("sales-rep", groups, "en-UK",
  taskSummaryHandler);
 
 
The WS-HumanTask specification also introduces the role of an administrator. An administrator can manipulate the life cycle of the task, even though he might not be assigned as a potential owner of that task. By default, jBPM registers a special user with userId "Administrator" as the administrator of each task. You should therefor make sure that you always define at least a user "Adminstrator" when registering the list of valid users at the task service.
Future versions of jBPM will provide a callback interface that will simplify the user and group management. This interface will allow you to validate users and groups without having to register them all at the task service, and provide a method that you can implement to dynamically resolve the groups a user is part of (for example by contacting an existing service like LDAP). Users will then be able to simply register their implementation of this callback interface without having to provide the list of groupIds the user is part of for all relevent method invocations.

12.2.5. Starting the human task service

The human task service is a completely independent service that the process engine communicates with. We therefore recommend to start it as a separate service as well. The installer contains a command to start the task server (in this case using Mina as transport protocol), or you can use the following code fragment:

EntityManagerFactory emf = Persistence.createEntityManagerFactory("org.jbpm.task");

TaskService taskService = new TaskService(emf, 
 SystemEventListenerFactory.getSystemEventListener());

MinaTaskServer server = new MinaTaskServer( taskService );

Thread thread = new Thread( server );

thread.start();
The task management component uses the Java Persistence API (JPA) to store all task information in a persistent manner. To configure the persistence, you need to modify the persistence.xml configuration file accordingly. We refer to the JPA documentation on how to do that. The following fragment shows for example how to use the task management component with hibernate and an in-memory H2 database:
<?xml version="1.0" encoding="UTF-8" standalone="yes"?>

<persistence

    version="1.0"

    xsi:schemaLocation=

      "http://java.sun.com/xml/ns/persistence

       http://java.sun.com/xml/ns/persistence/persistence_1_0.xsd

       http://java.sun.com/xml/ns/persistence/orm

       http://java.sun.com/xml/ns/persistence/orm_1_0.xsd"

    xmlns:orm="http://java.sun.com/xml/ns/persistence/orm"

    xmlns:xsi="http://www.w3.org/2001/XMLSchema-instance"

    xmlns="http://java.sun.com/xml/ns/persistence">


  <persistence-unit name="org.jbpm.task">

    <provider>org.hibernate.ejb.HibernatePersistence</provider>

    <class>org.jbpm.task.Attachment</class>

    <class>org.jbpm.task.Content</class>

    <class>org.jbpm.task.BooleanExpression</class>

    <class>org.jbpm.task.Comment</class>

    <class>org.jbpm.task.Deadline</class>

    <class>org.jbpm.task.Comment</class>

    <class>org.jbpm.task.Deadline</class>

    <class>org.jbpm.task.Delegation</class>

    <class>org.jbpm.task.Escalation</class>

    <class>org.jbpm.task.Group</class>

    <class>org.jbpm.task.I18NText</class>

    <class>org.jbpm.task.Notification</class>

    <class>org.jbpm.task.EmailNotification</class>

    <class>org.jbpm.task.EmailNotificationHeader</class>

    <class>org.jbpm.task.PeopleAssignments</class>

    <class>org.jbpm.task.Reassignment</class>

    <class>org.jbpm.task.Status</class>

    <class>org.jbpm.task.Task</class>

    <class>org.jbpm.task.TaskData</class>

    <class>org.jbpm.task.SubTasksStrategy</class>

    <class>org.jbpm.task.OnParentAbortAllSubTasksEndStrategy</class>

    <class>org.jbpm.task.OnAllSubTasksEndParentEndStrategy</class>

    <class>org.jbpm.task.User</class>


    <properties>

      <property name="hibernate.dialect" value="org.hibernate.dialect.H2Dialect"/>

      <property name="hibernate.connection.driver_class" value="org.h2.Driver"/>

      <property name="hibernate.connection.url" value="jdbc:h2:mem:mydb" />

      <property name="hibernate.connection.username" value="sa"/>

      <property name="hibernate.connection.password" value="sasa"/>

      <property name="hibernate.connection.autocommit" value="false" />

      <property name="hibernate.max_fetch_depth" value="3"/>

      <property name="hibernate.hbm2ddl.auto" value="create" />

      <property name="hibernate.show_sql" value="true" />

    </properties>

  </persistence-unit>

</persistence>

The first time you start the task management component, you need to make sure that all the necessary users and groups are added to the database. Our implementation requires all users and groups to be predefined before trying to assign a task to that user or group. So you need to make sure you add the necessary users and group to the database using the taskSession.addUser(user) and taskSession.addGroup(group) methods. Note that you at least need an "Administrator" user as all tasks are automatically assigned to this user as the administrator role.
The jbpm-human-task module contains a org.jbpm.task.RunTaskService class in the src/test/java source folder that can be used to start a task server. It automatically adds users and groups as defined in LoadUsers.mvel and LoadGroups.mvel configuration files.
The jBPM installer automatically starts a human task service (using an in-memory H2 database) as a separate Java application. This task service is defined in the task-service directory in the jbpm-installer folder. You can register new users and task by modifying the LoadUsers.mvel and LoadGroups.mvel scripts in the resources directory.

12.3. Human task clients

12.3.1. Eclipse demo task client

The Drools IDE contains a org.drools.eclipse.task plugin that allows you to test and/or debug processes using human tasks. In contains a Human Task View that can connect to a running task management component, request the relevant tasks for a particular user (i.e. the tasks where the user is either a potential owner or the tasks that the user already claimed and is executing). The life cycle of these tasks can then be executed, i.e. claiming or releasing a task, starting or stopping the execution of a task, completing a task, etc. A screenshot of this Human Task View is shown below. You can configure which task management component to connect to in the Drools Task preference page (select Window -> Preferences and select Drools Task). Here you can specify the url and port (default = 127.0.0.1:9123).

Notice that this task client only supports a (small) sub-set of the features provided the human task service. But in general this is sufficient to do some initial testing and debugging or demoing inside the Eclipse IDE.

12.3.2. Web-based task client in jBPM Console

The jBPM console also contains a task view for looking up task lists and managing the life cycle of tasks, task forms to complete the tasks, etc. See the chapter on the jBPM console for more information.


12.4.0 Connecting Human Task server to LDAP


jBPM comes with a dedicated UserGroupCallback implementation for LDAP servers that allows task server to retrieve user and group/role information directly from LDAP. To be able to use this callback it must be configured according to specifics of LDAP server and its structure to collect proper information.
LDAP UserGroupCallback properties
  • ldap.bind.user : username used to connect to the LDAP server (optional if LDAP server accepts anonymous access)
  • ldap.bind.pwd : password used to connect to the LDAP server(optional if LDAP server accepts anonymous access)
  • ldap.user.ctx : context in LDAP that will be used when searching for user information (mandatory)
  • ldap.role.ctx : context in LDAP that will be used when searching for group/role information (mandatory)
  • ldap.user.roles.ctx : context in LDAP that will be used when searching for user group/role membership information (optional, if not given ldap.role.ctx will be used)
  • ldap.user.filter : filter that will be used to search for user information, usually will contain substitution keys {0} to be replaced with parameters (mandatory)
  • ldap.role.filter : filter that will be used to search for group/role information, usually will contain substitution keys {0} to be replaced with parameters (mandatory)
  • ldap.user.roles.filter : filter that will be used to search for user group/role membership information, usually will contain substitution keys {0} to be replaced with parameters (mandatory)
  • ldap.user.attr.id : attribute name of the user id in LDAP (optional, if not given 'uid' will be used)
  • ldap.roles.attr.id : attribute name of the group/role id in LDAP (optional, if not given 'cn' will be used)
  • ldap.user.id.dn : is user id a DN, instructs the callback to query for user DN before searching for roles (optional, default false)
  • java.naming.factory.initial : initial conntext factory class name (default com.sun.jndi.ldap.LdapCtxFactory)
  • java.naming.security.authentication : authentication type (none, simple, strong where simple is default one)
  • java.naming.security.protocol : specifies security protocol to be used, for instance ssl
  • java.naming.provider.url : LDAP url to be used default is ldap://localhost:389, or if protocol is set to ssl ldap://localhost:636
Depending on how human task server is started LDAP callback can be configured in two ways:
  • programatically - build property object with all required attributes and register new callback
  • Properties properties = new Properties();
    
    properties.setProperty(LDAPUserGroupCallbackImpl.USER_CTX, "ou=People,dc=my-domain,dc=com");
    
    properties.setProperty(LDAPUserGroupCallbackImpl.ROLE_CTX, "ou=Roles,dc=my-domain,dc=com");
    
    properties.setProperty(LDAPUserGroupCallbackImpl.USER_ROLES_CTX, "ou=Roles,dc=my-domain,dc=com");
    
    properties.setProperty(LDAPUserGroupCallbackImpl.USER_FILTER, "(uid={0})");
    
    properties.setProperty(LDAPUserGroupCallbackImpl.ROLE_FILTER, "(cn={0})");
    
    properties.setProperty(LDAPUserGroupCallbackImpl.USER_ROLES_FILTER, "(member={0})");
    
    
    UserGroupCallback ldapUserGroupCallback = new LDAPUserGroupCallbackImpl(properties);
    
    
    UserGroupCallbackManager.getInstance().setCallback(ldapUserGroupCallback);


  • declaratively - create property file (jbpm.usergroup.callback.properties) with all required attributes, place it on the root of the classpath and declare LDAP callback to be registered (see section Starting the human task server for deatils). Alternatively, location of jbpm.usergroup.callback.properties can be specified via system property -Djbpm.usergroup.callback.properties=FILE_LOCATION_ON_CLASSPATH

  • #ldap.bind.user=
    
    #ldap.bind.pwd=
    
    ldap.user.ctx=ou\=People,dc\=my-domain,dc\=com
    
    ldap.role.ctx=ou\=Roles,dc\=my-domain,dc\=com
    
    ldap.user.roles.ctx=ou\=Roles,dc\=my-domain,dc\=com
    
    ldap.user.filter=(uid\={0})
    
    ldap.role.filter=(cn\={0})
    
    ldap.user.roles.filter=(member\={0})
    
    #ldap.user.attr.id=
    
    #ldap.roles.attr.id=


12.4.1. Configure escalation and notifications

To allow Task Server to perform escalations and notification a bit of configuration is required. Most of the configuration is for notification support as it relies on external system (mail server) but as they are handled by EscalatedDeadlineHandler implementation so configuration apply to both.
// configure email service

Properties emailProperties = new Properties();

emailProperties.setProperty("from", "jbpm@domain.com");

emailProperties.setProperty("replyTo", "jbpm@domain.com");

emailProperties.setProperty("mail.smtp.host", "localhost");

emailProperties.setProperty("mail.smtp.port", "2345");


// configure default UserInfo

Properties userInfoProperties = new Properties();

// : separated values for each org entity email:locale:display-name

userInfoProperties.setProperty("john", "john@domain.com:en-UK:John");

userInfoProperties.setProperty("mike", "mike@domain.com:en-UK:Mike");

userInfoProperties.setProperty("Administrator", "admin@domain.com:en-UK:Admin");


// build escalation handler    

DefaultEscalatedDeadlineHandler handler = new DefaultEscalatedDeadlineHandler(emailProperties);

// set user info on the escalation handler

handler.setUserInfo(new DefaultUserInfo(userInfoProperties));


EntityManagerFactory emf = Persistence.createEntityManagerFactory("org.jbpm.task");

// when building TaskService provide escalation handler as argument

TaskService taskService = new TaskService(emf, SystemEventListenerFactory.getSystemEventListener(), handler);

MinaTaskServer server = new MinaTaskServer( taskService );

Thread thread = new Thread( server );

thread.start();
Note that default implementation of UserInfo is just for demo purposes to have a fully operational task server. Custom user info classes can be provided that implement following interface:
public interface UserInfo {

    String getDisplayName(OrganizationalEntity entity);


    Iterator<OrganizationalEntity> getMembersForGroup(Group group);


    boolean hasEmail(Group group);


    String getEmailForEntity(OrganizationalEntity entity);


    String getLanguageForEntity(OrganizationalEntity entity);

}

      
If you are using the jBPM installer, just drop your property files into$jbpm-installer-dir$/task-service/resources/org/jbpm/, make sure that they are named email.properties and userinfo.properties.


                   For more information follow my Tutorial  online @ http://jbpmmaster.blogspot.com/